Attachment III - Technical Instructions
Technical InstructionsNOTE:
Customers may return vehicles because they are unsure if the incorrect Child Restraint Tether Anchorage Bolt Kit had been installed. Under these circumstances, follow the INSPECTION procedure described below.
Inspection
1. Remove rear interior trim panel.
2. Inspect thread area of the Child Restraint Tether Anchor Nut(s) (check both nuts).
3. If there is any evidence of thread galling or stripping, proceed to CHILD RESTRAINT SYSTEM TETHER ANCHOR NUT REPAIR section of this attachment.
4. If there is no evidence of thread damage:
a. reinsert the 1/4 inch rubber plugs (or equivalents) into the anchorage nut.
b. ensure that the new Child Tether Kit (identified with part number F42Z-61613D74-AA is in the vehicle glove box and that the old kit is removed, mutilated and scrapped.
c. ensure Owner Guide has been stickered with the revised pages (pages 33 and 34).
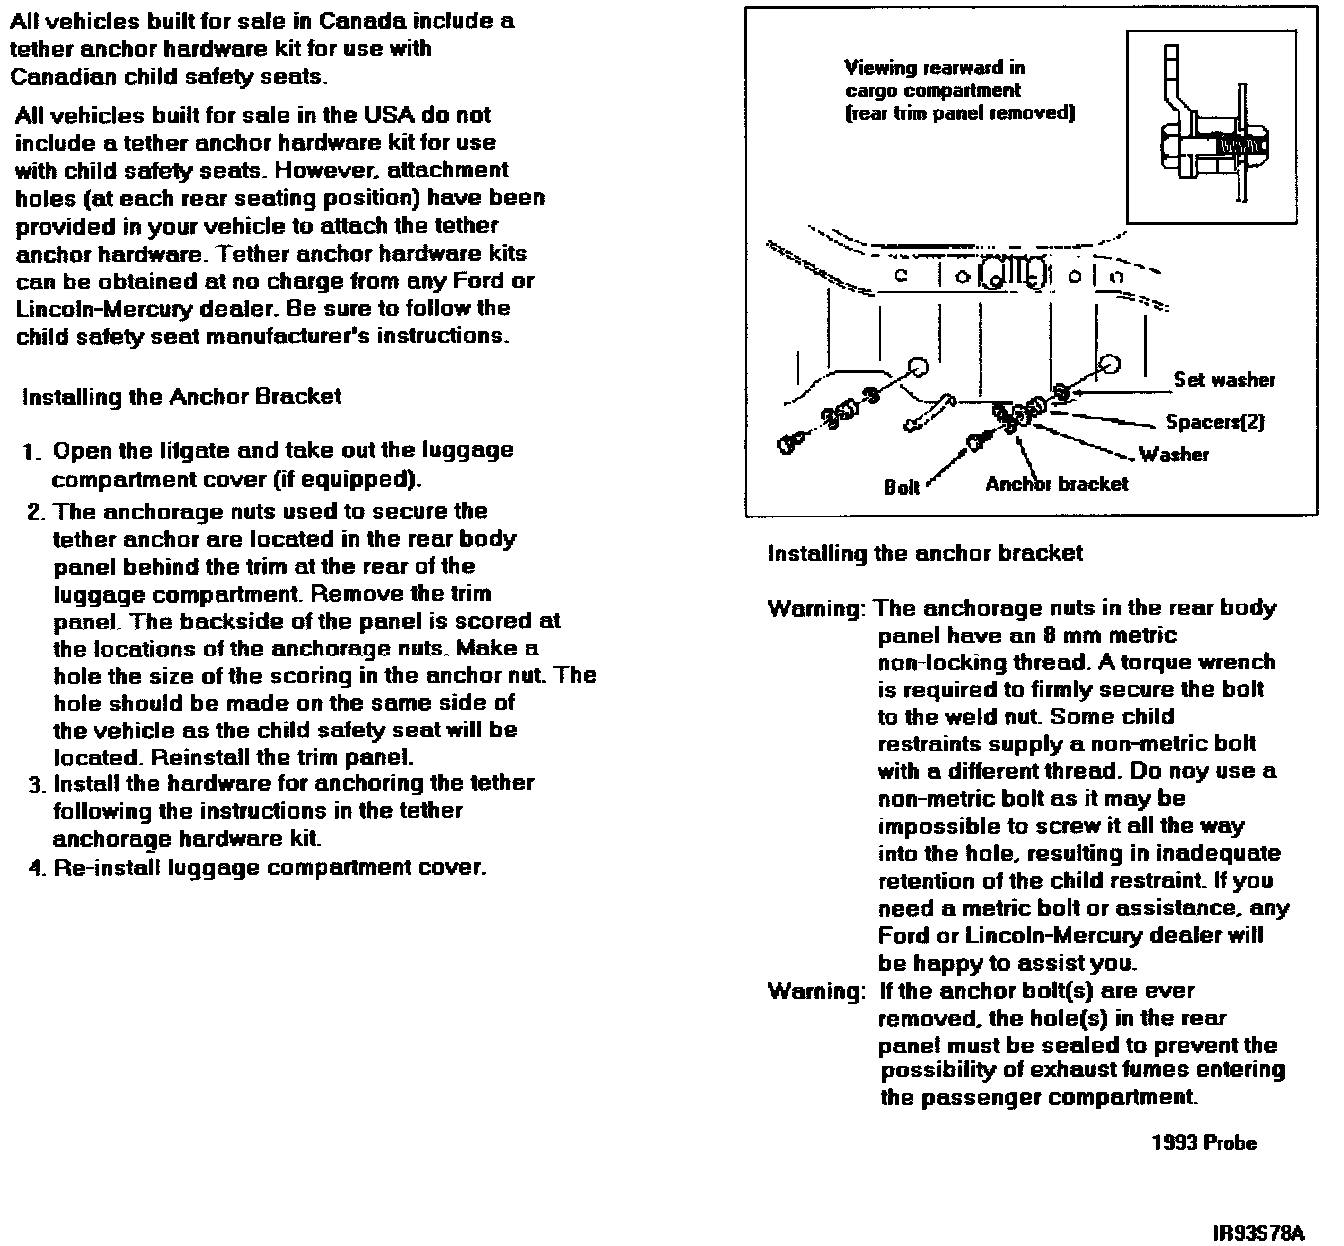
5. Install rear interior trim panel.
6. Release vehicle.
TECHNICAL INSTRUCTIONS CHILD RESTRAINT SYSTEM TETHER ANCHOR NUT REPAIR 1993 PROBE
Kit Contents - Part No. F32Z-61624K86-A
PART NUMBER DESCRIPTION QUANTITY
Nut Plate (Painted and Drilled) 2
Bolt M6 4
Nut M6 4
Rubber Plug 2
I.S.8160A Instruction Sheet 1
NOTE:
Only use this repair procedure if other than an 8 mm bolt was used to retain the child restraint system tether anchor.
1. Remove
a. Trunk lower side and rear trim panels. (Refer to 1993 Probe Shop manual, Section 01-05, pages 1 and 5).
b. Rear combination lamp assembly. (Refer to 1993 Probe Shop Manual, Section 17-01, page 17-01-53).
c. Rear license plate, rear bumper cover and foam insert. Do not remove rear bumper. (Refer to 1993 Probe Shop Manual, Section 01-19, pages 4 and 5).
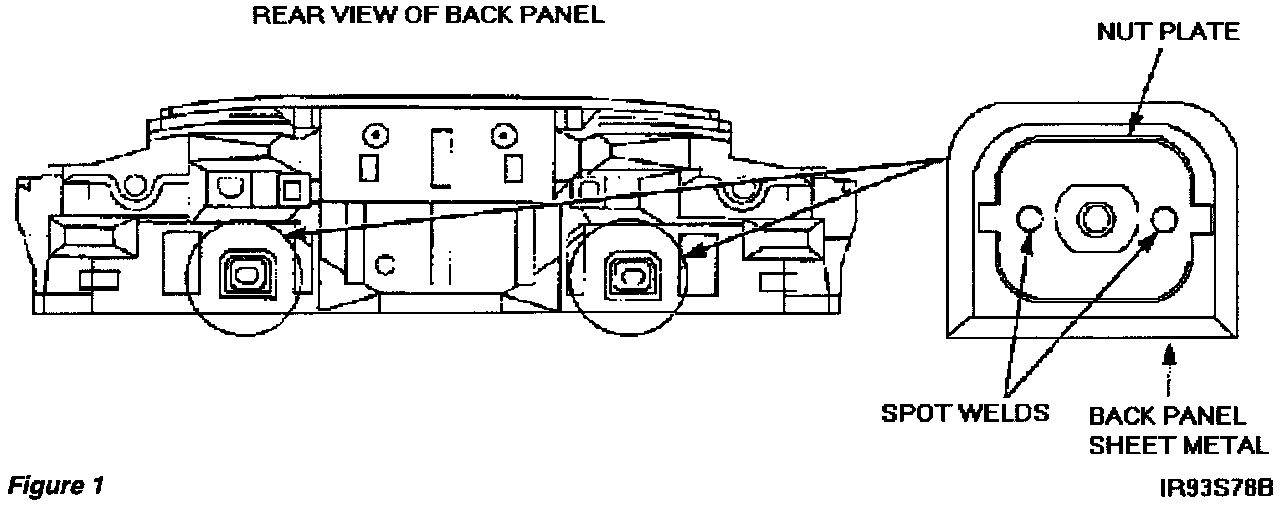
2. Locate the Child Restraint Tether anchor nut plate(s). (Refer to Figure 1)
a. Remove and keep rubber plug(s) from weld nut(s).
b. From the outside of the vehicle drill out the two (2) spot welds on the nut plate(s), in which the improper bolt was installed, with an 8 mm (5/16 inch) diameter drill to remove the welded-in nut plate.
NOTE:
^ Center punch the spot welds to prevent the drill from wandering.
^ As an aid to removing the welded-in nut plate(s), after drilling out the spot weld(s), use a stiff flat scraper to pry nut plate from the back panel.
^ Clean the exposed surface area using a wire brush.
3. Fit the new nut plate onto the outside surface of the back panel in the same location occupied by the removed nut plate. Retain in position with an 8 mm Child Restraint Seat Tether bolt from Kit (Part No. F42Z-61613D74-AA, located in vehicle glove box). (SCREWED IN FROM INSIDE OF VEHICLE).
4. Locate the two corner holes in the new nut plate(s):
a. Using a 6.5 mm (1/4 inch) diameter drill, and these holes as guides, drill out the back panel (from back of vehicle towards front of vehicle).
5. Loosen the 8 mm tether bolt(s) and remove the new nut plate(s).
a. Remove any burrs from the inside of the back panel.
b. Using SUPER SEAL (Part No. F3AZ-19515-SA), or equivalent, liberally coat the area (on the back panel) occupied by the nut plate(s).
NOTE:
Place a cloth on the inside surface over the holes to avoid SUPER SEAL overspray onto vehicle interior.
c. Using SUPER SEAL (Part No. F3AZ-19515-SA), or equivalent, coat the inner back panel area from which the burrs were removed.
d. Reinstall the new nut plate(s) using the 8 mm tether bolt(s).
6. Install the two M6 bolts and nuts:
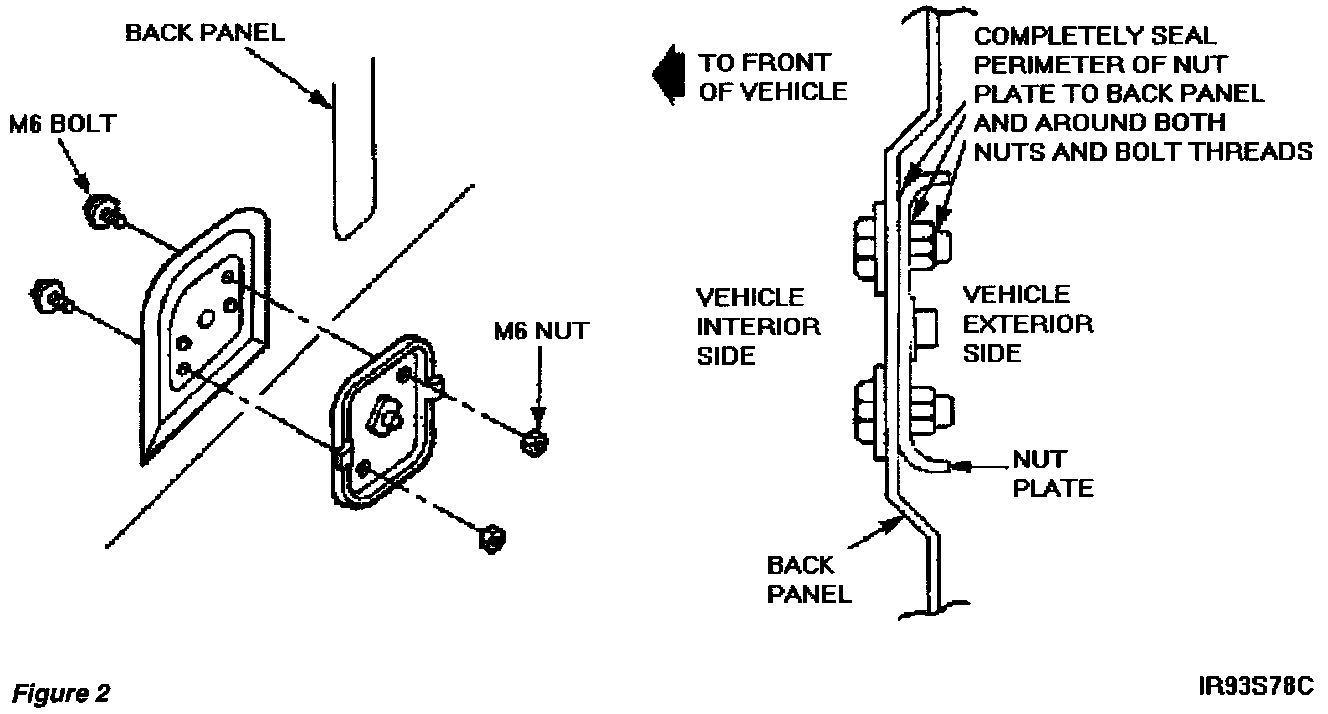
a. Torque to 8.3 +/- 1.5 N-m (6.1 +/- 1.1 lb.-ft.). ( Refer to Figure 2)
7. Completely seal the perimeter of the nut plate(s) to the back panel and around the nuts and bolts (thread area) using SUPER SEAL (Part No. F3AZ-19515-SA), or equivalent. (Refer to Figure 2)
8. Remove the Child Restraint Tether anchor bolt installed in Step 5. Clean off any SUPER SEAL material on this bolt.
9. If customer DOES NOT WANT the Child Restraint Tether Anchor Kit installed:
a. Keep the anchor bolt(s), removed in Step 8, with the Anchor Kit package in vehicle glove box for future use.
b. Install rubber plug(s) (from inside of vehicle) into the anchorage nut(s).
10. If customer WANTS the Child Restraint Tether Anchor Kit installed:
a. Make a hole(s) the size of the scoring in the rear trim panel to provide access to the anchorage nut(s). The backside of the trim panel is scored at the location(s) of the anchorage nut(s).
b. Keep the rubber plug(s) removed in Step 2 with the Anchor Kit in the glove box for future use.
NOTE:
Install the tether anchor bolt(s) after step 11 is completed (per the anchor kit instructions). Torque to 22.1 +/- 4.5 N-m (16.3 +/- 3.3 lb.-ft.).
11. Reinstall the rear foam insert, bumper cover, rear combination lamp assembly, license plate, trunk lower side and rear trim panel. (Refer to 1993 Probe Shop Manual, sections 01-19, 17-01 and 01-05).