Replacement
WARNING: Aftermarket wheel assemblies may NOT be compatible with the vehicle. Use of incompatible wheel assemblies may result in equipment FAILURE and possible INJURY. Use only APPROVED wheel assemblies.
REMOVAL
1. Set the parking brake and block the diagonally opposite wheel. On vehicles equipped with an automatic transaxle, place the selector lever in PARK (P) position. On vehicles equipped with a manual transaxle place the shift lever in REVERSE (R).
2. With the weight of the vehicle still on the tires, break the lug nuts loose. DO NOT REMOVE THE LUG NUTS AT THIS TIME.
3. Raise the vehicle until the wheel and tire clears the floor.
4. Remove the lug nuts. Remove the wheel and tire assembly.
INSTALLATION
WARNING: Whenever a wheel is INSTALLED, ALWAYS remove any corrosion, dirt or foreign material that may be present on the mounting surface of the wheel or the surfaces of the hub, brake drum or front disc brake rotor that contacts the wheel. Installing wheels without proper metal-to-metal contact at the wheel mounting surfaces can cause the lug nuts to LOOSEN and could allow the wheel to come off while the vehicle is in motion, causing LOSS OF CONTROL.
1. Position the wheel on the lug bolts.
2. Install the lug nuts making sure that the cone ends of the lug nuts face inward.
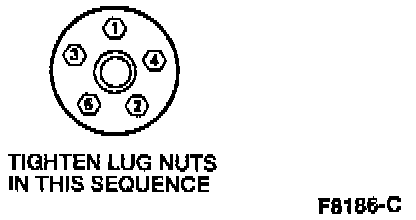
3. With the lug nuts loosely installed, turn the wheel until one lug nut is at the top of the bolt circle. Tighten the lug nut until snug. In a crisscross type pattern, tighten the remaining lug nuts until snug to minimize runout. Lower the vehicle.
4. Evenly tighten the lug nuts in the torque sequence shown in the illustration, to 88-118 Nm (65-87 ft. lbs.).